Showing posts with label SAP MDM XI Integration. Show all posts

Testing and Monitoring an Interface Between MDM & XI Part 2

clip_image001

· Select a message and press Display.

clip_image002

You may notice that I have selected a message that coantains an error and did not actually reach it's destination. In Call Adapter -> SOAP Header take a look at Error. If you double click that button a screen will appear on the right hand side that shows the details of the error.
clip_image003
This error tells us that something is wrong with the IDoc Adapter. It tells us that transaction IDX1 contains errors, but in this case the error is actually in the configuration of our communication channel, in which we have made reference to the wrong Port. If you select Call Adapter -> Payloads you can see the content of the XML message that came from MDM.
clip_image004
If you go back to SXMB_MONI you may want to also take a look at the Processing Statistics program that will show a good overview which can be helpful when testing your interface with thousands of materials.
clip_image005

3. Testing

Now we're going to go ahead and test out the interface from end to end. I'm assuming that by now you have turned on the MDM Syndication Server and your XI interface is activated in the Integration Directory. Lets log into the MDM Data Manager and create a new material for testing purposes.

· Right click -> Add

clip_image006

· Enter enough data to satisfy your interface requirements (ie: which fields must be populated?)

clip_image007

· Click on another material to save changes

· Close the MDM Data Manager

· Turn on your MDM Syndication Server (if it's not already turned on)

If your Syndication Server settings have been configured correctly then we can assume that because you added a new material to the data manager, it will now syndicate as soon as your interval cycles through (set in the mdss.ini file on your server). Lets go ahead and move over to the Exchange Infrastructure Runtime Workbench to see if it has processed our message. Keep in mind, depending on your interval time it may take a few minutes. Hopefully you should see something like this:
clip_image008
If the runtime workbench shows the message transferred successfully then lets log ino ECC and see if the IDoc was posted.

· Log into ECC system

· Run transaction WE02

clip_image009

· Press F8

· In the left hand pane, select Inbound IDocs -> MATMAS

clip_image010

· In the right hand pane, select the IDoc that just transferred and double click on it

· In the IDoc display, on the left hand side expand E1MARAM and select E1MAKTM

clip_image011

· Verify that the material data is correct

clip_image012

· Expand Status Records -> 53 and double click the only record available

clip_image013

· In the pop up window, copy the message number that was issued to the IDoc

· Press Proceed

· Paste the message number that you copied

clip_image014

· Press F8

clip_image015

You may notice that my image says material 11696 created. This is because a modification was made to an ABAP program to create a material when an IDoc is processed with a certain code. In this blog, the ABAP modification is out of scope, but I'm assuming if you are familiar with ALE then this process should be familiar as well. In any case, this is not a permanent solution, just a temporary solution to finish our prototype. If we take that newly generated material number and run transaction MM02 we should be able to pull up the details on that material.
clip_image016
Press Select Views and select Basic Data and continue.
clip_image017
Hopefully if all went as planned, the material should have transferred smoothly, with no loss in data. This concludes the three part series on MDM and XI. Thanks for reading, hopefully it helps!

Testing and Monitoring an Interface Between MDM & XI Part 1

2. Exchange Infrastructure

Now we'll take a look at the second half of this scenario and test out our XI interface.

2.1 Check Configuration

The only configuration we are going to check is the outbound communication channel. This is what tells Exchange Infrastructure where to pick up what file (location, filename) and do what after it's processed by the inbound communication channel (processing mode, ie: delete).

· Start your Integration Directory (Integration Builder: Configuration).

· Navigate to your outbound communication channel.

· Examine your File Access Parameters.

clip_image001

In my case, because this is a test scenario, I have a bash script picking up the file from the port directory and dropping it onto a drive that all of the SAP systems have access to; this being the /depot filesystem. As you can see I made a temporary folder on that filesystem for the files for this interface to be stored while waiting to be processed. Of course, the simplest way to do this would be to mount the Port directory from your MDM machine to your XI machine. Next take a look at your Processing Parameters and change the settings accordingly. For this particular scenario I have set the poll interval to 5 seconds for testing purposes. Also, notice that I am using delete as the processing parameter. This is so that I can verify that the file was processed, and so the folder doesn't get cluttered up with files.
clip_image002
If everything is the way you want it, lets go ahead and take a look at some important locations that will come in handy for testing and debugging the interface.

2.2 Important Locations

2.2.1 Integration Repository - Map Testing

Start the Integration Repository (Integration Builder: Design) and navigate to the map that we built in Part II. Select the Test tab.
clip_image003
To test our map, we can actually use the XML document that MDM generated via the Syndication Server. Lets go ahead and try this.

· Press the "Load Test Instance" button.

clip_image004

· Select the XML file MDM generated.

clip_image005

· Press the "Start Transformation" button.

clip_image006

If everything went smooth then you should see a pop up screen that says "Executed successfully". Otherwise you will recieve an error to which you can begin your debugging process.
clip_image007

2.2.2 Runtime Workbench - Component Monitoring

The runtime workbench is one of the most powerful and useful features of Exchange Infrastructure. Here we can get very detailed descriptions of errors that may occur with each component of XI. The component that we will want to pay particular attention to is the Adapter Engine.

· Log into your runtime workbench and select Component Monitoring -> Display.

clip_image008

· Click the Adapter Engine link.

clip_image009

Here you can view the status of the adapter. If there is an error in your configuration of a particular adapter it will show up here.
clip_image010

2.2.3 Runtime Workbench - Message Monitoring

Follow a similar procedure to display that Message Monitoring.
clip_image011

· Select your time filter, in this case I will select the last hour.

· Press Start.

clip_image012

You can now see the list of messages that have been processed by the Adapter Engine over the last hour. On my system only one message has been processed in the last hour. You can press either Details or Versions to view more information about any particular message that was processed.
clip_image013

2.2.4 Integration Engine - Monitoring

This is a particularly useful component of Exchange Infrastructure that allows us to view various aspects of the messages that get processed. Lets start by logging into the XI system and taking a look.

· Run transaction SXMB_MONI.

clip_image014

· Double-click Monitor for Processed XML Messages.

· Press F8 or the Execute button.

Testing and Monitoring an Interface Between MDM & XI

Hello and welcome back to the last of a three part series on integrating MDM with ECC with XI (sorry for the onslaught of acronyms). If you missed out on the first two you can find them here: Part I, Part II. In this one we will focus on testing out your scenario, and how to troubleshoot (where to look) in both MDM and XI. You may have already noticed that in the previous two parts of this series I used a sample scenario dealing with material master data and the MATMAS05 IDoc structure. Ultimately we want to generate a new material in ECC based on the creation of a material in MDM.So lets go ahead and get started. First we'll start with the syndication process in MDM, and making sure our settings are correct.

1. MDM

First we'll start with the syndication process in MDM, and making sure our settings are correct.

1.1 Check Configuration

1.1.1 Client-Side Settings

· Open the MDM Console

· Navigate to Ports in the repository to which your map is located.

clip_image001

· Verify that you have selected the correct map (built in Part I)

· Select your processing mode as Automatic

clip_image002

· Open the MDM Syndicator (Select the repository and press OK)

· Select File->Open

· Select the remote system representing ECC

· Select your map and press OK

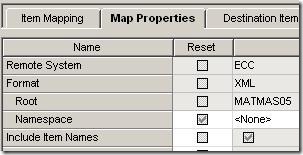
· Select the Map Properties tab
clip_image003

· Check Suppress Unchanged Records so we automatically update only changed records.

· Close and save your map

clip_image004

1.1.2 Server-Side Settings

· Open your mdss.ini file on the MDM server

· Verify that Auto Syndication Task Enabled=True

· For testing purposes, change the Auto Syndication Task Delay (seconds) to something rather small, such as 30 or less. This way you don't have to wait a long time for syndication when testing.

clip_image005

· Verify that the service is started.

· UNIX systems: ps -ef | grep mdss

· WINDOWS systems: open services, and look for entry regarding syndication server

· If service is not running, run command ./mdss (UNIX) or rightclick->start service (WINDOWS)

clip_image006

1.2 Important Locations

I'd like to go over some of the important locations (directories) on your server that will come in handy when troubleshooting and testing. One of the trickiest parts of working with MDM is figuring out where things go and where to look. Because it's so different from the SAP software that we are all used to, navigating the system is not as easy as running a transaction code. Also, MDM reacts to certain situations differently that you may expect, so it's important to know where to look when things aren't working properly. I'm working with MDM installed on HP-UX, however I will try to address each topic as it would appear in Windows to the best of my knowledge.

1.2.1 Home

Log onto your MDM server and navigate to the home directory for the MDM application server. On the server I am working with (sandbox) it happens to be located on the opt filesystem, and the path looks like /opt/MDM. In this directory take note of several important directories:

/opt/MDM/Distributions
/opt/MDM/Logs
/opt/MDM/bin

The Distributions folder is very important because this is where the port directories get created. When you create a port in the MDM Console for a particular repository, it creates a subset of folders in the Distributions directory based on which repository the port was created in, and whether the port is inbound or outbound. For example, in our particular scenario we may navigate to the path/opt/MDM/Distributions/install_specific_directory/Material/Outbound/. Here we will notice a folder entitled ECC which (if you followed the fist part of this series) corresponds to the port that we created earlier. This directory was created as soon as the port was created in the MDM Console. We will focus more on the contents of our port directory shortly.

The Logs folder contains several important log files, however most of them will not apply to our particular scenario, because the logs that we will want to look at are going to be specific to the syndication process, and are located within the port directory. Neverless, I thought it was important to mention that in certain troubleshooting scenarios, don't forget that these log files also exist.

The Bin directory is critical because that is where the files that start the app servers are located. The programs mds, mdss, and mdis are critical files.

1.2.2 Port

Your port directory is going to have the following format:
/MDM_HOME_DIRECTORY/Distributions/MDM_NAME/REPOSITORY/Outbound/REMOTE_SYSTEM/CODE/
For example the we created looks like this:
/opt/MDM/SID.WORLD_ORCL/Material/Outbound/ECC/Out_ECC/
Here you should see the following directories:

/Archive
/Exception
/Log
/Ready
/Status

The Archive directory is not as important during the process of syndication as it is with the process of importing data into MDM. This directory contains the processed data. For example, if you were to import an XML document containing material master data, a message would get placed in the archive directory for reference later if you ever needed to check.
The Exception directory is very important because often times when an error occurs you can find a file has been generated in the Exceptions folder that should look similar to that file that either the import server or the syndication server are attempting to import or syndicate. In other words, lets say you were attempting to import an XML document that contained material master data, but the map that was built in MDM has a logic error, the document will instead get passed to the Exceptions folder and the status of the port will be changed in the MDM Console program to "blocked".
The Log directory is important for the obvious reason. Logs are created each time the syndication server runs. So if your interval is 30 seconds, then a log will be generated in this folder every 30 seconds. It will give you the details of the syndication process which ultimately can be critical in the troubleshooting process.
The Ready folder is the most important folder in our scenario. When the Syndication Server polls during it's interval and performs the syndication, the generated XML message will appear in the Ready folder. So in the case of our scenario, we are going to have material master data exported to this directory and ultimately Exchange Infraustructure is going to pick up the data and process it to ECC.
The Status directory contains XML files that hold certain information pertaining to the import / export of data. This information includes processing codes and timestamps.

1.3 Testing

Now are going to test out our scenario and make sure that the export of materials works correctly. First things first, we need to create a new material in the MDM Data Manager. Make sure that your MDM syndication server is turned on! Remember on UNIX we can start it by running ./mdss in the /bindirectory, and on Windows by simply starting the service.

1.3.1 MDM Data Manager

· Start MDM Data Manager

· Connect to Material repository.

clip_image007

· Add a new material by "right-click".

clip_image008

· Fill in required fields to satisfy the map built in Part I.

clip_image009

· Verify the new product is saved by clicking elsewhere in the Records screen, and then back to the new Material.

clip_image010

1.3.2 Check Syndication

We are now going go verify that the syndication process is taking place as it should based on the settings in your mdss.ini file. If you have set the MDM Syndication Server to perform the syndication process every 30 seconds, as I set it for testing purposes, then by the time you log into your server the syndication should have already occured. Lets check by logging onto the server and navigating to the Ready folder in our Port directory.
/opt/MDMSID.WORLD_ORCL/Material/Outbound/ECC/Out_ECC/
If all went as planned your Ready folder may look something like this:

clip_image011
Those files are XML files that contain the data for each material in your repository that has changed. In this case the only materials in my repository are the two that I just added, so the MDM Syndication Server updated the Ready folder with both new materials. Now they are waiting for XI to pick them up and process them. Before we move over to the XI part lets take a look at one of these files and verify that the data in them is correct. Keep in mind that if you have already configured XI to pick up the files from this directory and process them, it's possible you won't see them here because they have already been deleted by XI (based on the settings in your communication channel).

1.3.3 Verify Data

Lets go ahead and open one of these files. I copied the file from the server to my local Windows running computer to examine the file, but of course you can read the file straight from the server if you prefer. If your mapping was done similar to mine, your file should look like a MATMAS05 IDoc in XML structure. This is to make it easier for XI to process since we can export in this format from MDM without much difficulty.
clip_image012

How MDM PI adapter works

This Blog explains how MDM – PI adapters works ,in 2007 I worked on MDM(5.5 SP04) and Data base integration using SAP XI, at that time there was no MDM-PI adapter, I have used File adapter to place the files in to FTP server, then MDM Import Server imported data from FTP and updated in to MDM Tables.

In reverse case MDM Syndicator syndicated XML files in to FTP, from there using File adapter picked up the data and processed to target system.

But now if you are working on MDM 7.1 integration with any other system using SAP PI (7.0 and 7.1), you don’t require File adapter, directly you can interact with MDM using MDM –PI Adapter.

Prerequisites:

SAP Net Weaver MDM 7.1

PI 7.0 (SP 15 and higher)

PI 7.1 (SP 07and higher) or PI 7.11 (SP01 and higher)

I am not going to explain how to configure MDM-PI adapter in PI point of view, it is pretty much simple.

Refer below help.sap.com link, which explains everything about MDM adapter configuration and deployment process and everything.

http://help.sap.com/saphelp_nwmdm71/helpdata/en/48/956cd09521062de10000000a42189d/frameset.htm

MDM PI adapter uses MDM Java API ports functionality to receive/send messages to MDM and it supports only asynchronous communication (QOS: EO and EOIO).

1)     Whenever you send data to MDM system using MDM PI adapter, it will not directly update data in MDM tables, first it will send data to MDM ready folder, then it will call MDM Master data import server (MDIS), MDIS looks at this file and run the import map for it, this Import map is responsible to import the file in MDM Tables.

2)     In this process data will be updated in to MDM Tables, once the import process is completed successfully, MDIS sends back an acknowledgment to MDM adapter saying that the import is successful, if there is any error, it tells that to MDM Adapter and you will see it in Communication channel monitoring of PI.

3)     MDMimports the message independently using the MDM Import Server (MDIS). Once the import is completed, a processed import event is triggered.

4)     The MDM PI Adapter captures the processed import event and updates the PI monitoring system with the message import status.

5)     When the incoming message is marked with a request for an application ACK (acknowledgement), an acknowledgement message is sent back to the sender system (for example, when the incoming message is an IDoc.

6)     When you use MDM PI adapter in sender mode to send data to PI, The data is available as an XML file(s) in the corresponding port folder.

7)     The MDM PI Adapter captures the syndication processed event and retrieves the data by using the functionality of the MDM Java API ports; in this process a syndication processed event is triggered.

MDM Error Handling:

1) Suppose MDM PI adapter delivered data to Ready folder, but data not updated in to MDM tables, in this case as a PI consultant point of view our job done, but MDM point of view to there is a some problem with import sever configuration, to identify this MDM Consultant have to look in to import server configuration file MDIS.in.

2) There is a file in "Ready" folder and waiting to be picked by MDIS and imported in MDM. if the port stays in this status for long time (generally more than 1-2 mins), it means MDIS is not picking the file and there is some issue in MDIS server. Ask MDM basis to look into this.

3)If it says "Blocked", this means MDIS tried to pick the file and run the import process but the XML schema of the incoming file (which you sent from PI) does not match the XML schema of the Import map. In this case you need to either process this file manually (via Import Manager) or delete this file and send correct file from PI.

MDM-PI adapter Advantages:

1) Message flow between PI and MDM can be monitored end to end (messages have been received and properly updated into MDM).

2) Error handling is improved because the communication channel is PI is pointing to one specific Repository port,

3) Restarting of messages if a service in unavailable in possible.

4) MDM Adapter can be used instead of the File adapter.

5) Higher reliability of data transfer.

6) Handles huge data.

SAP MDM-XI-R/3 Integration

This blog will show you how to integrate Master Data Management (MDM) and SAP R/3 using SAP PI in short frame using
SAP NetWeaver as framework.MDM and R/3 integration is required in two different scenarios as listed below.

Prerequisites
Prerequisites for integration of these scenarios include some of the software applications installed.
The list is as below:
SAP R/3 (4.6, 4.7, or any),
SAP MDM version 5.5 SP3 Server,
SAP MDM Syndicator,
SAP PI (Process Integration), formally XI (Exchange Infrastructure) Version 3.0 SP16

Outbound Scenario - MDM-to-R/3 (Inbound to R/3)

Inbound Scenario - R/3-to-MDM (Outbound to R/3)


PART – I (Inbound Scenario)
We will be discussing about Inbound process i.e. Inbound to the SAP R/3 and Outbound to the SAP MDM.

image
Figure 1.Inbound to R/3

MDM Console side Configuration Steps:
Step One-->Create Client System.
How To?
Logon to SAP MDM Console and choose the repository which you going to syndicate. Navigate the selected Repository
(Example Repository, BP3_PoC_Customer)-->Admin->Client Systems.
This right hand side you can find Client Systems context area. If you right click on context area, you will get the Context menu Items,
choose-->Add Client System, Enter Name of a client system (Example.Siebel), Code and Type. See the below Figure 2.

image image
Figure 2.Client System

Step Two-->Create Port for Client System.
How To?
Select-->Ports--> by navigating MDM Console-->Repository (BP3_PoC_Customer)-->Admin-->Ports.
By clicking on the Ports you will get Context Area in the right side.
Right click on the Context Area and you will get Context Menu.
From selections choose the Menu Item -->Add port.
Here you need to give TWO ports details, one is for Outbound, and other one is for Inbound. In this step we need Outbound Port.
The Port Name is SIEBEL_OB_CUS_SIEBELCUS01, Code SIEBEL_OB_CUS_SIEBELCUS01, and Type as Outbound. See the Figure 3 below.
image
image
Figure 3.Port

MDM Server Side Configuration
In the SAP MDM Server-->Look at the server folder structure for the repository.
Here, you can see the Client system and Outbound Port details as folder name in the SAP MDM Server folder,
which creats in MDM console as shown in below figure 4.
image
Figure 4. SAP MDM Server Folder

NOTE: No customizing required in MDM Server but you need to ensure whether the folders as explained here are created in the
inbound and outbound folders after additions of the ports in console.

FTP Server Side Configuration
Step Three in the FTP Server
How To?
Configure/Specify the file folder path for pulling the file in FTP Server.This is screen refers the FTP server configuration (WS_FTP server)
image
Figure 5.FTP Server

SAP XI / PI Side Configuration
Step FourSender Communication Channel
In the PI Integration Repository
image
Figure 6.Sender CC

Step Five Receiver Communication Channel
image

Figure 7.Receiver CC

Inbound Process Flow
image
Figure 8. Process Flow

>>>Here, I will be discussing about inbound process, the above figure shows the entire process

Process step in MDM: You need to choose the destination structure, i.e. type of the destination file like XML, XLS, and CSV.
Then mapping will have to do in the MDM Syndicator that for specified repository and then syndicate the repository.
The syndicated repository data will save as predefined type in the Ready folder of SAP MDM Server.
(SAP MDM 5.5--> Server-->Distributions-->bp1bocap080.bp.co_MSQL--> BP3_PoC_Customer--> Outbound-->Siebel--> SIEBEL_OB_CUS_SIEBELCUS01--> Ready)

Process step in PI: Here you need to need specify the File Communication Channel Path as folder specified/created as in the MDM sever. i.e.(Outbound-->Siebel--> SIEBEL_OB_CUS_SIEBELCUS01 -->Ready) as per FTP Server configuration.
The File Adaptor picks up the file and then PI process starts. In the PI transformation and conversion happens and then sends the IDoc to the R/3Inbound port.

Process step in R/3: Here the IDoc receives to Inbound port and then IDoc is available in R/3.


SAP Developer Network Latest Updates